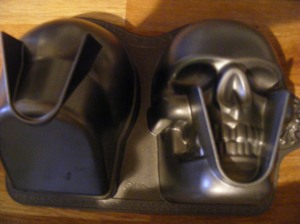
Silverwood Croquembouche Set – Product review

I don’t know about you but everytime I turn on a baking show at the moment they seem to be making a croquembouche! I don’t believe I have ever had one, however,  and to be honest with you,  everyone I have spoken to recently haven’t had one either! I blame The Great Britsh Bake Off! The contestants on the show are supposed to be amateur bakers but the skills they are expected to have are way beyond the normal cook!

I bought this croquebouche set because I have a sneaky feeling that I will start getting orders for croquembouches as wedding cakes soon. It happened with cupcakes, then whoopie cakes, then macaroons, then cake pops so I’m am expecting a croquembouch onslaught shortly!

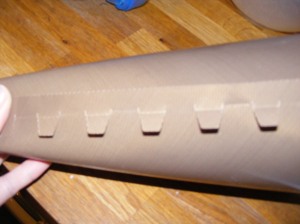
I have quite a few Silverwood products and can honestly say I have never had a problem with them. My adjustable cake tin is fantastic so I had high hopes for this set. It wasn’t quite what I was expecting, however. I had visions of a big metal funnel because the ebay picture was not very clear and the description simply said a croquembouche set. That is not how it came however.  The set consits of a base, cap and flexible non-stick sheet that you wrap around into a cone shape. “That’s clever!” I thought and it is but in fairness it is a bit fiddly.

Firstly you need to make the cone shape. The sheet has a tab and slot setup but because the nonstick material is slippy the cone does not hold its shape very well. I followed the instructiosn to the letter but since they are written instructions and I am clearly a visual learner I did find them quite difficult to follow (and I’m not stupid! I have a PhD in muscle physiology!).  Eventually I resorted to using old Faithful and slapped some sellotape along the seem.


Although I have made Choux pastry in the past (my Nan has a thing for Chocolate Eclairs!) I promised myself that I would stick religiously to the method provided. I have to say when I read the recipe I had my doubts. I was taught that to make proper Choux you made a Roux then beat in the eggs until the “furry saucepan” stage and so on. This method was so diffierent  that I really saw this as an exercise in futility but I am glad to say I was wrong. I made up the ingredienst as per the instructions for making a large croquembouche but actually only made a small one because there is only the two of us and the profiteroles keep well enough in an airtight container.

Ingredients: (for crouquembouche formed outside the cone)

  • 375ml water
  • 150g butter
  • 175g plain flour
  • 5 large eggs, beaten

Method:

  1. Preheat the oven to 200C / 180c fan. (I deviated a bit by adding a small tray of water to the bottom of the oven because the steam helps the pastry to rise)
  2. Line several baking trays with parchment paper.
  3. Put the butter and water to be put in a pan, covered with clingfilm and bring to the boil.
  4. Remove the cling film with out getting second degree burns from the steam!
  5. Dump all the flour straight into the just boiled liquid  and beat to a smooth paste.
  6. Transfer the paste to a mixing bowl and allow to cool for 5 minutes
  7. Beat in the eggs a little at a time until the paste is smooth and glossy. (I used my Kenwood and poured the eggs in a slow, steady stream whilst the mixer was running but you can do it by hand)
  8. Spoon the mixture into a piping bag fitted with a plain 5mm diameter nozzle.
  9. Pipe 5cm diameter blobs into the lined trays, allowing room for the profiteroles to spread. Use wet fingers to flatten an peaks in the pastry.
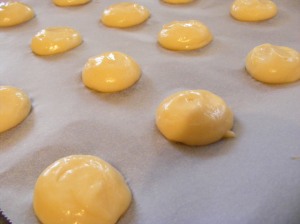
  10. Bake for 20 minutes until golden brown and well risen.
  11. Remove from the oven and pierce the bottom of each profiterole with a skewer to allow steam to escape (This prevents the pastry going soft).
  12. Return to the oven for a further 3 minutes the remove and allow to cool completely on a cooling rack.
  13. Fill the profiteroles with either Creme Anglaise or Chantilly cream
  14. Melt togther the sugar and water and bring to a boil. The sugar is ready when the sugar thermometer reads 310F (154C)
  15. Plunge the pan into cold water to stop the sugar from continuing to cook from the residual heat in the pan. Make sure you do not alllow any water to get into the sugar as you will have to start again!
  16. Carefully dip the profiteroles in the sugar (THIS IS VERY HOT) then pile them inside or outside the cone. Inside is for a smaller croquembouche 
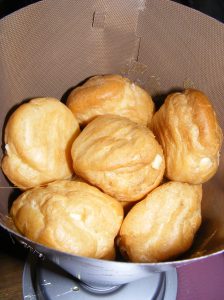
  17. Allow the sugar to set, at least 30 minutes, then carefully peel away the non-stick cone.
  18. Decorate with extra spun sugar if you desire.

All in all this is a decent little set. I think the company need to work on the cone a little or give better instructions on how to construct it as I clearly had issues but at the end of the day I produced a croquembouche! Plus I will be switching to this Choux recipe from now on because it was so easy!

Date and Walnut biscotti

Do any of you have kids that, for whatever reason, have problems with school attendance? Well, I’ve mentioned before that my son has chronic pain syndrome that effects his legs. The winter months are particularly difficult because cold exacerbates his condition. It has been a battle to get him up and moving every day, leave alone get him into school! Not helped by the negative attitude of some of the teaching and support staff who seemed to think that Ben was “putting it on” or being lazy. Let’s face it, would you want to go in to school, drugged up on pain relief medication only to be moaned at for being late or missing last lesson?

That is why I am particularly proud of Ben his academic year. Not only has he significantly improved his school attendance but he was explained to his teachers the nature of his condition. He has made sure that if he misses any lessons due to absence or hydrotherapy, that he catches up on any missed work. With the exception of English, Ben is in the top few of all his classes and is doing particularly well in his ICT and Business Studies classes. So how could I refuse him today when he asked me if I had any biscotti spare that he could give to his ICT teacher? Apparently she reminds him of me! Not sure if that is a good thing or not!

Needless to say I bagged up a mixed batch and put a pretty bow on the top. His response was, “Thanks, Mum, but a bit of sellotape would have done!” Boys!!

Ingredients:

12 oz plain flour

2tsp baking powder

1tsp mixed spice

9 oz caster sugar

3-4 free range eggs, beaten

6 oz chopped dates

4 oz chopped walnuts

Method:

  1. Preheat oven to 180C / 160C fan.
  2. Line 2 large baking sheets with baking parchment
  3. Place the flour, sugar, baking powder and mixed spice in a mixing bowl then a stir in the eggs until a soft dough forms.
  4. Add the fruit and nuts
  5. Turn the dough onto a lightly floured board and split the dough into 4 equal pieces.
  6. Lightly flour your hands then roll each piece of dough into a sausage shape approximately 12 inch long.
  7. Place the dough onto the prepared trays, making sure they are well spaced.
  8. Bake for 15-25 mins until the dough is well risen, firm to the touch but not too brown.
  9. Allow to cool for a few minutes on a cooling rack.
  10. Reduce the oven temperature to 140C / 120C fan
  11. Cut the dough diagonally, using a bread knife, into 1cm thick slices.
  12. Place the slices back onto the baking sheets, cut side down, and bake for 10-15 minutes.
  13. Turn the slices over and bake for a further 10-15 minutes.
  14. Allow to cool completely.

Chocolate and Hazelnut biscotti and Hector the Whippet

Have you ever had one of those day when you would quite like the world to stop so that you can get off, please? Well that is how I have felt today!  One of my whippets, Hector, has been violently sick all night long. Hector has an auto-immune disease called glomerulo nephritis. It is a chronic condition which varies from day-to-day. He has good days and bad days but generally he is a happy chappy. I was about to say happy little chappy but in fairness, Hector is a bit of a chunky whippet due to the steroids and other meds that he has to take to keep his condition under control.

I know that Hector is not going to be with me for a long but as long as he is pain-free, happy and has a good quality of life then I’m happy. So having been up with him all night and seeing that he still wasn’t right this morning and still had a raging temperature, you can imagine my dismay when my marvelous vet, Rachel, said she wanted to keep him in,do some bloods and get him on a drip. Needless to say I was imagining the worst. Not helped by my Mother telling me that it is cruel to let him suffer! Yes, I know Mum! Why do you think I’m in such a state?

I truly believe in quality of life rather than quantity so I really was prepared for the worse. Imagine my delight when I got the call to say that I could go and pick him up! Hector is presenting as having a mild case of pancreatitis probably caused by eating pigs ears as a treat. Apparently the fatty treat puts too much strain on the pancreas if your dog already has a chronic underlying ailment. So no more pigs ears for Hector and lots more medication instead!

I wish you could have seen the big goofy smile and the waggy tail when Hector was brought into the consulting room and that was just from me! I know that when the time comes I will make the right decision to let Hector go painlessly and with dignity but not just yet! Thank goodness!

In the meanwhile I will make the most of my oversized whippet and while away the hours baking. Here, as promised in my Christmas morning biscotti post, is my version of chocolate and hazelnut biscotti. They taste just like nutella!

Ingredients:

10 oz plain flour

2 oz cocoa

2tsp baking powder

9 oz caster sugar

3-4 free range eggs, beaten

1 tsp vanilla extract

6oz hazelnuts

4 oz dark chocolate

Method:

  1. Preheat oven to 180C / 160C fan.
  2. Line 2 large baking sheets with baking parchment
  3. Place the flour, cocoa, sugar and baking powder in a mixing bowl then a stir in the eggs until a soft dough forms.
  4. Add the nuts and chocolate
  5. Turn the dough onto a lightly floured board and split the dough into 4 equal pieces.
  6. Lightly flour your hands then roll each piece of dough into a sausage shape approximately 12 inch long.
  7. Place the dough onto the prepared trays, making sure they are well spaced.
  8. Bake for 15-25 mins until the dough is well risen, firm to the touch but not too brown.
  9. Allow to cool for a few minutes on a cooling rack.
  10. Reduce the oven temperature to 140C / 120C fan
  11. Cut the dough diagonally, using a bread knife, into 1cm thick slices.
  12. Place the slices back onto the baking sheets, cut side down, and bake for 10-15 minutes.
  13. Turn the slices over and bake for a further 10-15 minutes.
  14. Allow to cool completely.

Traditional Fruit Cake Recipe for a Celebration cake

I am asked time and again for my fruit cake recipe. More and more brides are choosing to have sponge wedding cakes but many still require a small fruit cake for cutting (Don’t get me started on why you can’t have a small fruit top-tier – just read my wedding cake post!).

To make a really good traditional fruit cake, it is essential that you have enough time to allow your cake to mature before it is eaten, at least 6 weeks if not longer. I personally like to get my Christmas cakes made over the October Half Term holiday so that they will be ready for Christmas.

Most fruit cakes contain some form of alcohol. The alcohol of choice is down to personal preference. I always use whiskey because I think it compliments the earthiness of the fruit whilst my best friend swears by brandy and even know someone who uses Armagnac. The alcohol is important because it acts as a natural preservative whilst the cake matures and, of course, adds another flavour dimension.

Traditionally the cake was always painted with boiled apricot jam before the marzipan was added but nowadays most bakers prefer to paint the cake with more of the alcohol used in the cake. This “sterilises” the cake surface before the marzipan is applied and so eliminates any potential microbial growth. Boiling the apricot jam is simply not as effective a method.

The recipe I use has been in family for years. It belonged to my Great Aunt Olive. She was the most amazing cook! I spent many an hour standing on a chair beside her whilst she made a batch of homemade fudge or mince pies. She didn’t have any children of her own so upon her death I inherited her cook books. This particular recipe came from a dog-eared copy of a now out of print Stork Recipe book.  This is one of the few recipes that I have not altered because, in my opinion, it is perfect as it is. If it was good enough for Auntie Ol then it is good enough for me!

I will be sharing my last-minute fruit cake recipe shortly  for those of you who leave everything to the last-minute (the cake is on the cooling rack as I type!)

The following amounts shown will be enough to make an 8 inch cake.

Ingredients:

365g currants

250g sultanas

150g raisins

90g glace cherries, halved and washed

90g mixed chopped nuts

90g mixed peel

zest of 1 lemon or 1tsp lemon oil

250g plain flour

1.25tsp mixed spice

0.5tsp nutmeg

60g ground almonds

225g margarine

225g brown sugar

1 tbs black treacle

5 eggs

Spirit of choice – whiskey, brandy etc

Method:

  1. Preheat the oven to 150C / 130C fan.
  2. Grease and line a deep 8 inch cake tin
  3. Cream the sugar and butter together until light and fluffy.
  4. Beat in the eggs, treacle and lemon oil.
  5. Stir in the dried ingredients and the ground almonds
  6. Fold in the fruit.
  7. Pour into the prepared tin and bake for 2.5-3 hours.
  8. The cake is cooked when a skewer comes out of the cake cleanly.
  9. Remove from the tin and place on a cooling rack. Stand the rack over a tray.
  10. Stab the cake all over with a skewer then apply alcohol liberally with a pastry brush. I tend to stop when the alcohol starts to drip into the tray under the cake.
  11. When completely cold, wrap the cake in greaseproof paper and place in an airtight container. Store for at least 6 weeks.

This cake should not need to be “fed” with more alcohol whilst it is maturing but I do paint it liberally with alcohol before I marzipan it. 

Last minute fruit cake

I have taken a number of phone calls over the past couple of years where I have been asked to provide a fruit cake for the following weekend  or even the following day! I have felt so mean having to turn people down especially when they start to tell you how their friend promised to make the wedding / birthday cake and then let them down at the last-minute or how Mum insisted on baking the wedding cake only to find that it is not as easy as it looks in the magazine! Since fruit cakes are not as popular these days with brides-to-be I tend not to keep maturing cakes in stock, only making them when specifically ordered.

I did, however, stumble across this little beauty of a recipe in a compilation of recipes from Australia‘s “Woman’s Own” magazine. It is a boiled fruit cake! I have made a boiled Chocolate Orange fruit cake in the past which boils the fruit in Tia Maria and results in a darkly decadent, rich fruit cake. This recipe is a little bit more down to earth and uses Sherry.

My best friend was kind enough to be my guinea pig for this recipe when she asked me to make an Olympic themed birthday cake for her husband. I asked them to give me their honest opinion but instead they saved me a piece and said try it yourself! I have to say that this cake is absolutely gorgeous! It is packed with fruit, 1kg in fact, and the sherry and orange zest /oil adds a beautiful citrus note without it being too cloying. 

I am so impressed with this recipe that I have decided to switch to using this for all of my wedding / birthday cakes. It really is that good!

Ingredients:

  • 1kg mixed dried fruit (currants, sultanas, raisins, glace cherries, prunes, mixed peel etc)
  • 250g butter
  • 275g light brown sugar
  • 250ml sherry (plus extra for spiking)
  • 60ml water
  • zest of 2 oranges or 2 tsp orange oil
  • 4 eggs, beaten
  • 225g plain flour
  • 75g self-raising flour
  • 2 tsp mixed spice
  • 165g ground almonds

Method:

  1. Preheat the oven to 150C / 130C fan.
  2. Grease and line a deep 8 inch cake tin.
  3. Place the fruit, sugar, butter, sherry, water and orange into a large saucepan. Heat gently, stirring occasionally until all the butter and sugar has melted then bring to the boil.
  4. Remove the pan from the heat and allow the mixture to cool.
  5. Beat in the eggs into the cooled mixture then fold in the dry ingredients.
  6. Turn into the prepared tin and bake for 3 hours. (I needed to put some foil over the cake about half way through to prevent it from getting to dark)
  7. Remove from  the oven and whilst still hot paint liberally with extra sherry.
  8. Allow the cake to cool in the tin then turn onto a cooling rack to cool completely.


Christmas morning biscotti

I love biscotti especially with a ridiculously expensive cup of coffee but until now I have never tried to bake them.”Biscotti” is the plural form of biscotto. The word originates from the medieval Latin word biscoctus, meaning “twice-cooked/baked.” (as quoted byWikipedia). I think it is this twice baked method that has put me off. As I have mentioned before, I have long-standing love affair with biscuits and biscotti is no exception so I bit the bullet and had a go at making them.

The recipe that I adapted for these biscotti came from the Good Food Guide and was called Christmas Biscotti. Now when it comes to Christmas, most families have their own little traditions such as everyone sitting down together to watch the Queen’s speech at 3 o’clock or having a slice of pork pie and a sherry for breakfast (yes, thank you, Su, for that one!). Ours, not surprisingly, involved biscuits.

Ben and I have been on our own for over 13 years now and when he was little we would load up the car on Christmas eve and do the 3 hour journey down from North Wales to Worcester to spend Christmas day with my family. Then we would do the reverse journey on Boxing day so that Ben could spend the week between Christmas and New Year with his dad in Liverpool. This went on for several years until eventually Ben and I decided that we wanted to spend Christmas day at home together, where he could make as much noise as he wanted and could play with his toys (nowadays it is his X-box!) and we could just relax.

We now have our own little traditions. We buy each other new pyjamas which we wear all Christmas day because it is the only day of the year when we don’t have to go out and no-one visits! We are both allowed to open one small present on Christmas eve but only one. This was to stop Ben spontaneously combusting as a small child from sheer excitement! And we always have freshly baked cookies for breakfast and served with an ice-cold glass of milk.

I am sure in the next few years this is all set to change. Ben has growing up fast. At 15 he towers above me and I am fast learning that just because I think something is a good idea, it doesn’t mean to say that Ben thinks the same! He is a young man with his own mind who is not afraid to share this opinions and thoughts. My little boy is almost a young man.  That is a frightening thought in itself! The one thing that I can depend on not changing, however, is our Christmas morning cookies since Ben has already asked if we can have my chocolate chip cookies this year. Having seen how easy these biscotti are to make I think that these get my vote for Christmas Morning Biscotti too.

Ingredients:

12 oz plain flour

2tsp baking powder

2tsp mixed spice

9 oz caster sugar

3-4 free range eggs, beaten

1 tsp orange oil

3 oz raisins

3 oz glace cherries halved

4 oz flaked almonds

Method:

  1. Preheat oven to 180C / 160C fan.
  2. Line 2 large baking sheets with baking parchment
  3. Place the flour, sugar, baking powder and mixed spice in a mixing bowl then a stir in the eggs until a soft dough forms.
  4. Add the fruit and nuts
  5. Turn the dough onto a lightly floured board and split the dough into 4 equal pieces.
  6. Lightly flour your hands then roll each piece of dough into a sausage shape approximately 12 inch long.
  7. Place the dough onto the prepared trays, making sure they are well spaced.
  8. Bake for 15-25 mins until the dough is well risen, firm to the touch but not too brown.
  9. Allow to cool for a few minutes on a cooling rack.
  10. Reduce the oven temperature to 140C / 120C fan
  11. Cut the dough diagonally, using a bread knife, into 1cm thick slices.
  12. Place the slices back onto the baking sheets, cut side down, and bake for 10-15 minutes.
  13. Turn the slices over and bake for a further 10-15 minutes.
  14. Allow to cool completely.


Wilton 3D Skull cake tin – product review

I don’t know about you but I have a stupid amount of cake tins. Admittedly I do make wedding and birthday cakes for a living but there are some tins I have only ever used once. I have either bought them for a specific cake or it was an impulse buy because it looked nice! I mean, do I really need a beehive shaped tin or a Christmas wreath tin? What can I say in my defence? Nothing!

There are some shaped tins that I own, however, that I wouldn’t be without; my giant cupcake tin and a spherical tin are both used regularly. I have a feeling that this Wilton 3D Skull tin will be another. In fact I have already taken an order for a 60th birthday cake in January! I think this cake tin will pay for itself!

I am always a bit wary of shaped cake tins because invariably it does not do what the manufacturers say it does. The most common complaints being:

  • their example recipe is either in terms of shop bought cake mixes or if is simply inaccurate in terms of how much mixture is actually needed to fill the tins.
  • the cooking times are wrong or you have to cook each section separately because they each have a different cooking time.
  • the cakes stick to the tin which makes turning the cakes out very difficult and often results in the cake shape being damaged.

This particular cake tin had pumpkin spice pound cake as its suggested recipe to use. I personally am not over keen on pumpkin and certainly wouldn’t want a pumpkin flavoured cake. On review of their recipe and by converting cups to pounds and ounces I decided that my 6 egg maderia cake recipe should be a suitable alternative.

I made sure that the tin was well-greased and given a dusting of flour, preheated the oven and away I went. I split the mixture evenly between the two sections even though the one side does look like it needs more (it is a bit of an optical illusion!) and popped it in the oven at 160 C/ 140 C fan for 1 hour as per the manufacturers instructions.

Well, my first surprise was that they cooked perfectly in exactly 1 hour!

I left them in the tin for 5-10 mins then decided to turn them out onto a cooking rack. I fully expected to have to do battle with the tin to release the cakes but, surprise number 2, they turned out perfectly with no intervention from me!

Obviously the intention is for the two sections to come together to create a 3D skull shape but, as with all cakes,the tops are not perfectly flat. Wilton, however, have thought of that! They have designed their tins to have a “cutting” ridge. That means that once the cakes are cooked and completely cooled you can trim them using the cutting ridge as a guideline. The 2 sections will them fit perfectly together. I did find it necessary, however, to push a dowel through the cakes to stop the “face” cake sliding once I sandwiched them together with buttercream.

I cannot fault this cake tin! It is absolutely brilliant! I am sure that this tin will be escaping from cake tin purgatory on a regular basis! Well Done, Wilton!


Cheese Scones


I think  may have mentioned before that I have had  Love/Hate relationship with homemade scones for years. Well, I loved them but they hated me. That was until I discovered that buttermilk would be my salvation! My  good old fashioned scones have not failed me yet and this is the basis for my cheese scones.

 I don’t think you can beat a good cheese scone; spread with a (un)healthy dollop of butter and served with a bit of ham and pickles! They make a great alternative to butties in the kids’ lunch boxes too!

I think the key to these scones is your choice of cheese. It needs to be a good quality hard cheese such as mature cheddar or Red Leicester. I personally prefer a mixture of the two. If you want to really pack a punch, you could always add a little grated parmesan or pecorino to the other grated cheeses.

I also add a bit of smoked paprika to the dry ingredients. I find it just adds a little depth of flavour to the scone. Cayenne pepper or English mustard powder works well too but can be a bit spicy for some people. You could always add a teaspoon of dried mixed herbs instead or even some finely chopped crispy bacon. Basically, whatever you fancy!

Ingredients:

 500g plain flour

1 tsp bicarbonate of soda

2 tsp cream of tartar

0.5 tsp smoked paprika

125g  butter (cold)

1 egg

275ml buttermilk

150g grated hard cheese

Method:

  1. Preheat an oven to 200◦ C /180 ◦ C fan
  2. Sift the dry ingredients into  mixing bowl
  3. Cut the butter into pieces and rub into the dry ingredients until it resembles breadcrumbs.
  4. Add 100g grated cheese into the mixture.
  5. Add the egg and slowly add the buttermilk until you form a soft dough.
  6. Roll the dough out until it is rough the depth of your index finger (1.5cm ish) and cut out with a 2 inch cutter.
  7. You should make approximately 14 scones.
  8. Brush a little milk on top of each scone and add some of the remaining cheese to each scone
  9. Bake for approximately 12 minutes or until the scones are well risen and golden brown
  10. Transfer to a cooling rack


Florentines

I have spent a lovely afternoon pottering around my kitchen. It is at this time of year that I usually start planning what Christmas presents that I am going to make. In the past I have made miniature Christmas pudding truffles, various chutneys, summer fruit vodka and, of course, Christmas cakes.

I have had my “Christmas head” on for a few weeks already. as I will be teaching my night school sugarcraft class how to marzipan, ice and decorate a fruit cake for Christmas. I have come up with four different designs for my students to learn. Obviously I will be demonstrating to my students so that will take care of a few presents!


 My personal favourite to make is chutney. I made a gorgeous chutney last year which was literally Christmas on a spoon. It smelt like Christmas and tasted like it. Absolutely gorgeous! I was planning on making some more this year but I currently have a 15 year old begging me not to make any chutney at all! Ben simply cannot stand the smell of it cooking! I have even tried in the past to make it during the day whilst he is at school with all the doors and windows wide open. Even that didn’t work! He opened the front door and literally wretched from the residual smell. He is such a wimp!

So this year I thought I might try my hand at something new hence the pottering in the kitchen. Being a scientist I do like to experiment a bit and as all scientists will tell you not every experiment is a success. A couple of things went straight into the bin but I have had a couple of successes today too. I have to say my florentines are gorgeous and ridiculusly easy to make! They also contain my favourite ingredient, conny onny milk!

Florentines that you buy in the shops simply do not compare to these! They are crispy on the outside with a lovely chewy centre and a backing of rich dark chocolate that cuts through the sweetness of the condensed milk. The ones I have made  today are really simple; almonds, cherries and raisins but you could add allsorts instead. I quite fancy using different coloured glace cherries or maybe dried cranberries and toasted cocnut. It is entirely down to individual taste.

Similarly you can alter the chocolate backing. I used dark chocolate because that is my favourite but you could just as easily use milk or even white chocolate. In fact a selection of florentine with different chocolate backings in a fancy box would make a really special Christmas gift.

Ingredients:

25g butter

25g light brown sugar

100 g condensed milk

150g almonds and dried fruits  

chocolate of your choice, melted

Method:

  1. Preheat oven to 180 °C / 160°C fan.
  2. Melt the sugar, butter and condensed milk together in a saucepan and heat until the mixture just starts to bubble.
  3. Add the dry ingredients and mix well togteher.
  4. Onto a parchment paper lined baking tray drop teaspoons of mixture. Don’t be too generous with the mixture as they spread. Leave plenty of room between each.
  5. Bake until the outside edges of each florentine are golden brown, 6-12 minutes depending on the size of your florentine.
  6. Leave to cool completely on the tray then peel away from the parchment paper.
  7. Dip the backs of  the florentins into your chosen chocolate. allow the chocolate to set.